

My Post-session Workflow for Portrait Photography
Details
Header image taken by Jessica Cassandro Photography!
My Post-session Workflow for Portrait Photography
Today I’m excited to share with you my post-session workflow for portrait photography! When I say “portrait photography,” I’m referring to families/seniors/etc! Keep in mind that my workflow may not necessarily work perfectly for you. It’s important to develop a workflow that suits you and your business. I hope that seeing my personal post-session workflow inspires you to create one that works well for you! It’s also important to note that you can always make adjustments. 🙂 Okay, let’s dive in!
Skyler’s Post Session Workflow for Portrait Photography
1. After wrapping up a session, I head home and transfer the images from my SD cards to both my computer and external hard drive for safekeeping. Although some photographers prefer backing up on two hard drives, I find this method quicker and simpler for me. Remember, do what feels right for you! A crucial note: I keep the images saved on my computer until I’ve delivered the final gallery to my clients and also retain the files on both SD cards until then!
2. Next, I use Photo Mechanic to cull the images. I don’t necessarily do this immediately after the session, but rather when my schedule allows, which also gives me time to detach from any unsuccessful shots. Honestly, waiting helps me curate a stronger final gallery. Depending on the session, I might even cull through the images 2-3 times to get them to a reasonable number.
3. Once I’ve selected the keepers, I create a new Lightroom catalog (yes, a brand new catalog solely for that photo session), naming it with the date and client names to keep things organized. In the new catalog, I flag every chosen image as a “Pick” (P) and then select one photo from every unique lighting scenario to edit as a reference for the entire set. I do this by quickly scrolling through the images and flagging one chosen image in each set as “green” (8).
4. After editing the color flagged images, I’ll sync their edits with all other photos in the same unique lighting scenario. This gives me a rough idea of what my final edits will look like for the entire gallery!
5. I’ll do another round of culling inside Lightroom, using tools like “compare” (C) and “survey” (N) if needed.
6. Then I edit the full gallery, refining the selected images even further as I go.
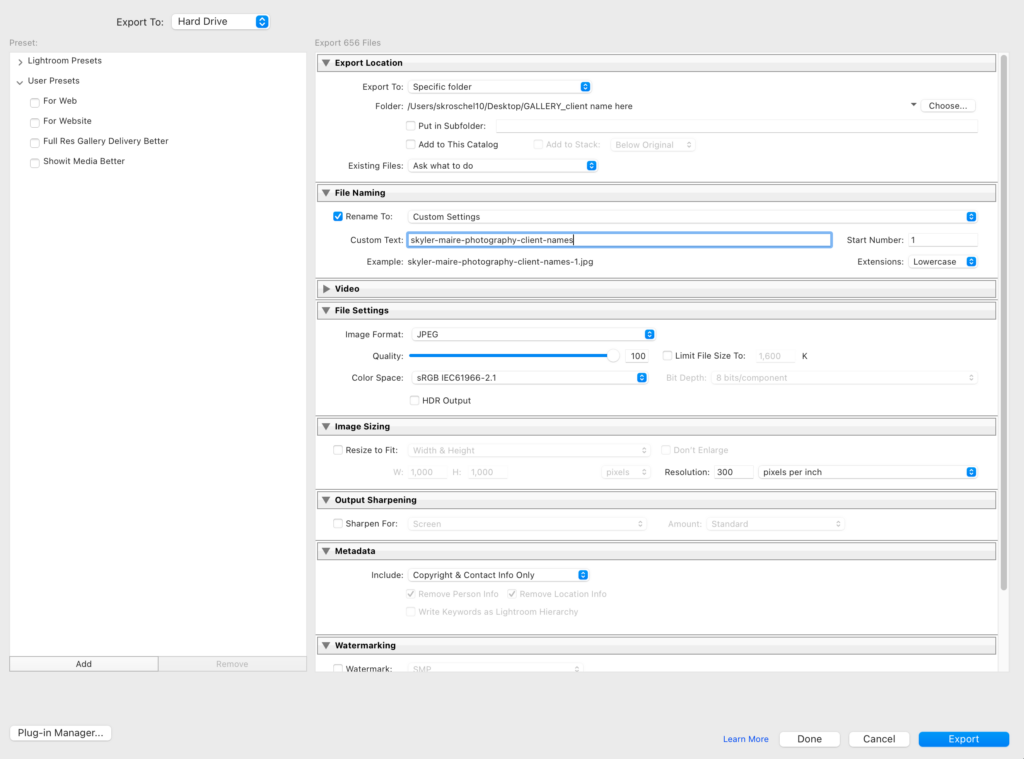
7. Once edited, I export the full gallery of images to my computer desktop with high-resolution settings. See below!
8. The gallery is then uploaded to Pic-time for delivery. There are many different gallery delivery options available, many with free subscriptions to get you started! If you’re interested in using Pic-time, you can use this link to get your first month free!
9. I select a favorite image for the cover and then highlight my personal favorites within the gallery. I like to rename this scene, “Skyler’s favorites,” and randomize the images in that selection. This not only showcases a diverse range of creative images right off the bat, but also enhances the visual appeal of the gallery, in my personal opinion. 🙂
10. After previewing the gallery to ensure everything looks perfect, I send the gallery to my clients!
Well there you have it! My complete post-session workflow for a portrait session. I hope you enjoyed this post and found it useful! Be sure to drop any questions you have in the comments below!
If you enjoyed this post, you may also love:
10 Tips for Beginner Family Photographers
5 Creative Senior Poses to Try at Your Next Senior Portrait Session
May 12, 2024


Be the first to comment